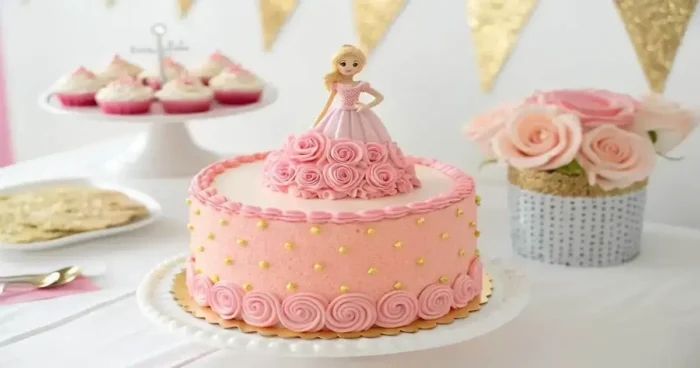
A Barbie cake isn’t just a dessert; it’s a centerpiece that brings joy and excitement to any celebration. Imagine the smiles when you unveil a stunning cake designed to look like a doll wearing a beautiful edible gown! It’s the perfect blend of creativity and indulgence, and the best part? It’s easier to make than you think. With simple steps and a little creativity, you can transform basic ingredients into a show-stopping masterpiece that’s as delicious as it is delightful.
Plus, this cake is incredibly versatile—whether it’s a princess-themed birthday or an elegant event, you can customize it to suit any theme. From vibrant colors to edible accessories, the possibilities are endless. It’s like crafting edible art!
So, what are you waiting for? If you’ve ever dreamed of baking something truly unforgettable, this is your chance. Keep reading to discover everything you need to create your very own Barbie cake and make your next celebration one to remember!
How to Make a Barbie Cake from Scratch
Choosing the Perfect Cake Base and Flavor
The first step to creating a delightful Barbie cake is choosing the right cake base and flavor. Whether you’re a fan of classic vanilla, rich chocolate, or a unique fruity base, the key is to pick a flavor that matches the theme and pleases your guests. Start with a recipe you’re comfortable with, as this ensures your cake will be both delicious and stable for decorating. If you’re looking for something unique, try experimenting with a marble cake or a fruity base like strawberry. Then, think about pairing the cake with complementary fillings, like a luscious buttercream or a tangy cream cheese frosting. Also, consider the occasion; for example, a light citrus flavor works well for summer events. Once you’ve chosen, make sure the cake layers are baked evenly to avoid wobbling. This is the foundation of a stunning Barbie cake, so take your time and enjoy the process!
Step-by-Step Instructions for Assembling the Cake
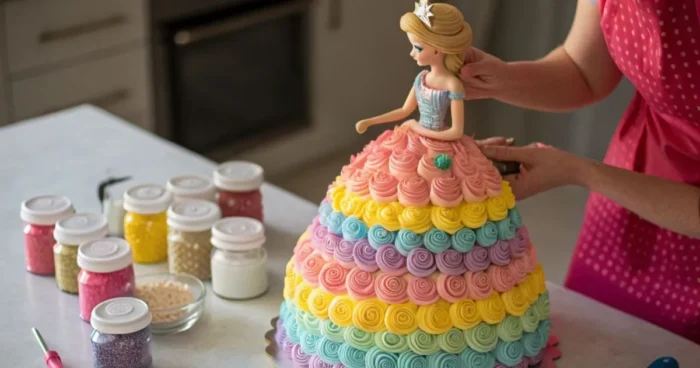
Assembling your Barbie cake is where the magic starts to happen. First, gather your baked cake layers, frosting, and the doll centerpiece. Then, carefully trim the tops of your cakes to create a flat surface, which ensures they stack evenly. Next, layer the cakes with a generous spread of frosting in between, building up the structure of your Barbie cake. Once the base is stacked, carve the cake into a gentle dome shape to form the gown. It’s like sculpting but with dessert! Insert the Barbie doll into the center, making sure it’s secured. After that, apply a crumb coat of frosting to catch any stray crumbs. Finally, chill the cake for about 20 minutes to set the structure. These steps are simple but crucial to ensure your Barbie cake is ready for its fabulous decoration phase.
Decorating Ideas for Your Barbie Cake

Creative Frosting and Color Options
Decorating your Barbie cake is where creativity takes center stage. Begin by choosing a color palette that matches the theme. Soft pastels are perfect for princess vibes, while bold hues can make a fashion statement. For inspiration, explore themes like seasonal cake decorations or experiment with textures using buttercream, and fondant, or a mix of both to create the doll’s gown. First, smooth the frosting over the cake to create a base layer. Then, add texture with piping techniques like ruffles or rosettes for a dramatic look. If you want a modern touch, consider ombré effects or metallic accents. You can also mix in edible glitter for sparkle. Don’t forget to experiment with different piping tips to create unique patterns. This is your chance to let your imagination shine! A beautifully frosted Barbie cake will not only taste amazing but also wow everyone at the party.
Adding Accessories for a Personalized Touch
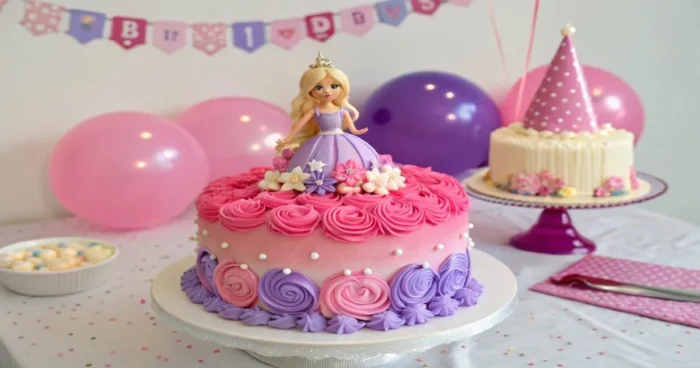
Accessories bring personality to your Barbie cake, making it truly one of a kind. First, think about the theme. For a princess Barbie, add edible pearls or sugar flowers. If it’s a modern Barbie, consider fondant handbags, shoes, or even a stylish sash. Next, use edible markers or paints to add intricate details to fondant decorations. You can also personalize the cake by writing a name or special message with icing. Another fun idea is to use candy or sprinkles to create playful accents. In addition, think outside the box with small toys or non-edible decorations for added flair. However, remember to remove any inedible items before serving. Accessories are like the icing on the cake—literally! They add that extra wow factor, ensuring your Barbie cake is a showstopper that guests will remember.
Barbie Cake Designs for Special Occasions

Birthday-Themed Barbie Cakes
Birthday parties and Barbie cakes are a match made in heaven. For a kid’s party, go all out with bright colors, edible glitter, and fun themes like fairy-tale princesses or ballerinas. You could also incorporate the birthday child’s favorite colors or hobbies into the design. First, create a layered cake base, then carve it into a gown shape. Add playful decorations, like candy jewels or sugar flowers, to complete the look. If it’s for an adult celebration, opt for a more elegant design with muted tones and sleek accents. For example, a chic black-and-white gown with gold trim can create a sophisticated vibe. Whether it’s youthful or elegant, a Barbie cake is always the centerpiece of the celebration, drawing smiles and compliments from everyone in the room.
Seasonal and Holiday-Inspired Decorations
Seasonal Barbie cakes add a festive touch to any holiday celebration. For a winter theme, try a snow queen Barbie cake with frosty blue hues, edible snowflakes, and shimmering accents. For spring, think floral designs with pastel shades and sugar blossoms. Summer cakes can feature bright, tropical colors or a beach-themed design, while autumn allows for rich hues like burgundy and gold. Also, consider holiday-specific decorations. A Barbie cake for Halloween could have a spooky yet glamorous vibe, while a Christmas cake might showcase red and green tones with candy cane accents. These seasonal ideas not only make the cake visually appealing but also tie it perfectly to the event. A seasonal Barbie cake is more than a dessert—it’s a creative expression that makes any celebration unforgettable.
Essential Tools and Materials for Making a Barbie Cake
Must-Have Baking Equipment
Having the right tools is essential to make a flawless Barbie cake. Start with a sturdy cake pan—round or dome-shaped pans work best for forming the gown. A serrated knife is crucial for leveling and carving the cake layers. Next, invest in an offset spatula for smooth frosting application. A turntable makes decorating much easier, as you can rotate the cake effortlessly. Don’t forget piping bags and a variety of tips for creating decorative details. Also, have a sturdy cake board to support the cake’s weight. Mixing bowls, a hand or stand mixer, and measuring tools are other must-haves. These tools not only make baking more manageable but also help you achieve professional-looking results. Having everything on hand ensures you can focus on the fun part—bringing your Barbie cake vision to life!
Specialty Items for Perfect Barbie Cake Details
For the finishing touches, specialty tools can elevate your Barbie cake. Fondant tools, like rolling pins and cutters, are ideal for creating intricate designs. Edible glitter, food-grade paints, and airbrushing kits can add stunning details to the gown. Use silicone molds to craft edible accessories like flowers, bows, or jewelry. In addition, edible markers are perfect for adding delicate details, like lace patterns or embroidery. If you’re going for a polished look, a bench scraper can help achieve perfectly smooth frosting. Specialty tools not only make decorating more fun but also ensure a flawless result. They help transform a simple cake into a work of art, ensuring your Barbie cake is the star of the show.
Tips for Achieving a Professional-Looking Barbie Cake
Avoiding Common Mistakes in Cake Decoration
Mistakes can happen, but with some tips, you can avoid common pitfalls in your Barbie cake. First, always let the cake cool completely before frosting it; otherwise, the frosting might melt. Next, use a crumb coat to lock in stray crumbs and create a smooth surface for the final layer. Also, ensure your frosting consistency is just right—not too runny or stiff. If you’re working with fondant, dust your surface with cornstarch to prevent sticking. Another important tip is to secure the Barbie doll properly in the cake to avoid any wobbles. Finally, practice your piping techniques on parchment paper before decorating the cake. These simple tips will help you sidestep common issues and create a professional-looking Barbie cake that’s both beautiful and delicious.
Techniques for Smooth Frosting and Detailing
Achieving smooth frosting on your Barbie cake might feel intimidating, but it’s easier than you think. First, apply a thin crumb coat to catch all the crumbs, then chill the cake for a few minutes. Next, use an offset spatula or a bench scraper to spread the frosting evenly. Smooth in long, continuous strokes for a polished look. For details, use piping bags with different tips to add texture and design. Ruffles, rosettes, or even lace patterns can transform your cake into a masterpiece. If you’re adding fondant, roll it out thinly and drape it carefully over the cake, smoothing it with your hands or a fondant tool. These techniques not only create a flawless finish but also ensure your Barbie cake looks like it came straight from a professional bakery!
Frequently Asked Questions (FAQs)
How much do you charge for a Barbie cake?
The cost of a Barbie cake can vary depending on its size, design, and level of decoration. A simple homemade Barbie cake might only cost you the price of ingredients, typically around $20 to $30. However, professionally made Barbie cakes can range from $50 to $150 or more. Customizations, like intricate designs or premium ingredients, may increase the price. If you’re on a budget, making your own Barbie cake is a fun and affordable option. Plus, it’s a creative way to add a personal touch to your celebration. No matter the cost, a Barbie cake is always worth it!
How to make Barbie cake without pan?
You don’t need a special pan to make a Barbie cake—it’s all about creativity! First, bake a few round cake layers using standard pans. Then, stack them with frosting in between to create height. Next, carve the stacked layers into a dome shape to mimic a gown. Insert the Barbie doll into the center, wrapping her legs in plastic to keep things clean. After that, crumb-coat the cake to lock in crumbs, then decorate it as you wish. It’s a simple and fun way to create a Barbie cake without extra equipment. You’ll love the results!
How to bake a cake in a mixing bowl?
Baking a cake in a mixing bowl is a great way to get a dome shape for your Barbie cake. First, ensure your bowl is oven-safe—most metal or glass bowls work well. Grease it thoroughly to prevent sticking. Next, pour in your cake batter, filling the bowl no more than two-thirds full. Bake it at the recommended temperature, but add extra time since the bowl is deeper than a pan. Check for doneness with a toothpick. Once baked, let it cool completely before decorating. It’s a fun and easy method to make a unique-shaped cake!
Bring Your Barbie Cake Vision to Life and Delight Everyone!
Creating a Barbie cake is more than just baking—it’s a chance to bring joy and creativity to your celebration. First, you’ve learned how to choose the right base, assemble layers, and decorate with flair. Next, you discovered how to customize your cake for any theme or event, making it truly unique. Also, with the right tools and tips, achieving a professional finish is easier than you think. It’s like crafting a masterpiece that everyone will admire! Most importantly, the fun lies in the process, whether you’re baking for kids or adults. So, gather your ingredients, embrace the challenge, and let your imagination guide you. A Barbie cake isn’t just a dessert; it’s a show-stopping centerpiece that creates lasting memories. You’ve got all the inspiration and tips you need to make it unforgettable. Now, it’s time to get started and make magic happen!
Recap Table: Barbie Cake Preparation
Ingredients and Number of Servings
| Ingredient | Quantity | Notes |
|---|---|---|
| All-purpose flour | 3 cups | Sifted for even texture |
| Granulated sugar | 2 cups | Adds sweetness |
| Baking powder | 2 ½ teaspoons | For leavening |
| Unsalted butter | 1 cup | Softened |
| Eggs | 4 large | Room temperature |
| Milk | 1 cup | Whole or 2% recommended |
| Vanilla extract | 1 ½ teaspoons | Enhances flavor |
| Food coloring (optional) | As needed | For custom cake colors |
| Buttercream frosting | 4 cups | For filling and crumb coating |
| Fondant (optional) | 1-2 lbs | For smooth, detailed decorations |
| Edible decorations (pearls, glitter, etc.) | As needed | Customize to theme |
Number of Servings:
Serves 12-15 people, depending on slice size.
Nutritional Values (Approx. Per Serving)
Serving size: 1 slice (based on 12 slices)
| Nutrient | Amount |
|---|---|
| Calories | 420 |
| Total Fat | 18g |
| Saturated Fat | 10g |
| Cholesterol | 90mg |
| Sodium | 220mg |
| Total Carbohydrates | 56g |
| Sugars | 40g |
| Protein | 5g |
Summary Instructions
| Step | Action |
|---|---|
| Preparation | Preheat oven to 350°F (175°C). Grease and flour cake pans. |
| Mixing | Cream butter and sugar. Add eggs one at a time, then mix in vanilla. |
| Combining Dry Ingredients | In a separate bowl, whisk flour and baking powder. Gradually combine with wet mixture. |
| Baking | Pour batter into pans. Bake for 25-30 minutes or until a toothpick comes out clean. |
| Shaping | Stack baked cakes with frosting between layers. Carve into a dome shape. |
| Inserting Doll | Place wrapped Barbie doll into the center of the cake. |
| Frosting and Decorating | Apply crumb coat, chill, then add final frosting layer. Decorate as desired. |
| Serving | Allow cake to set for 1 hour before serving. Enjoy! |
Preparation and Cooking Times
| Task | Time Required |
|---|---|
| Preparation Time | 20 minutes |
| Baking Time | 30 minutes |
| Cooling Time | 20 minutes |
| Assembly and Decoration | 40 minutes |
| Total Time | 1 hour 50 minutes |
A Barbie cake blends creativity, nostalgia, and joy. Inspired by Barbie’s 1959 debut, it’s a fun, rewarding centerpiece. This dessert celebrates style and imagination, perfect for any occasion. Simple steps transform basic ingredients into a stunning, edible masterpiece. It’s the ultimate way to make celebrations truly unforgettable!
